Rendering Mermaid Charts
Markdown Monster supports rendering Mermaid Diagrams both as inline content in Markdown documents, or by using Mermaid files (.mmd) that are self-contained Mermaid documents.
Mermaid File Format (.mmd)
Markdown Monster supports Mermaid as a file format for files with an .mmd extension:
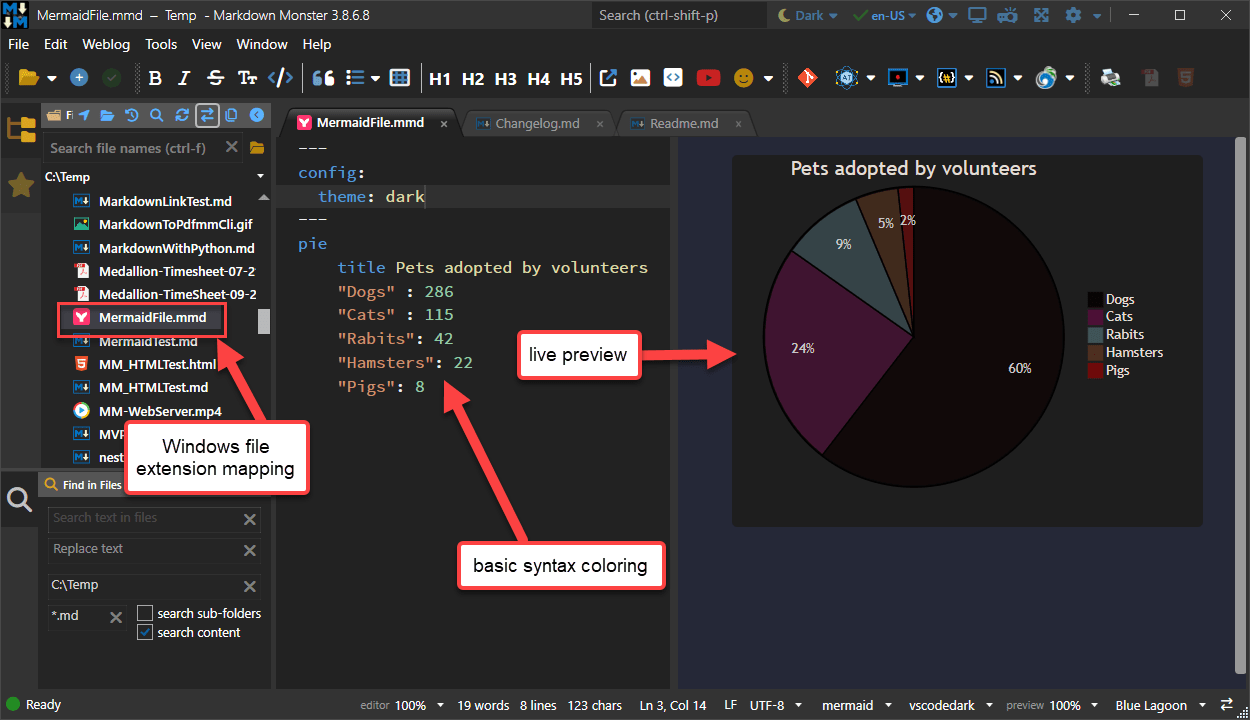
Mermaid files render a single raw Mermaid diagram with live preview.
Mermaid Embedded in Markdown
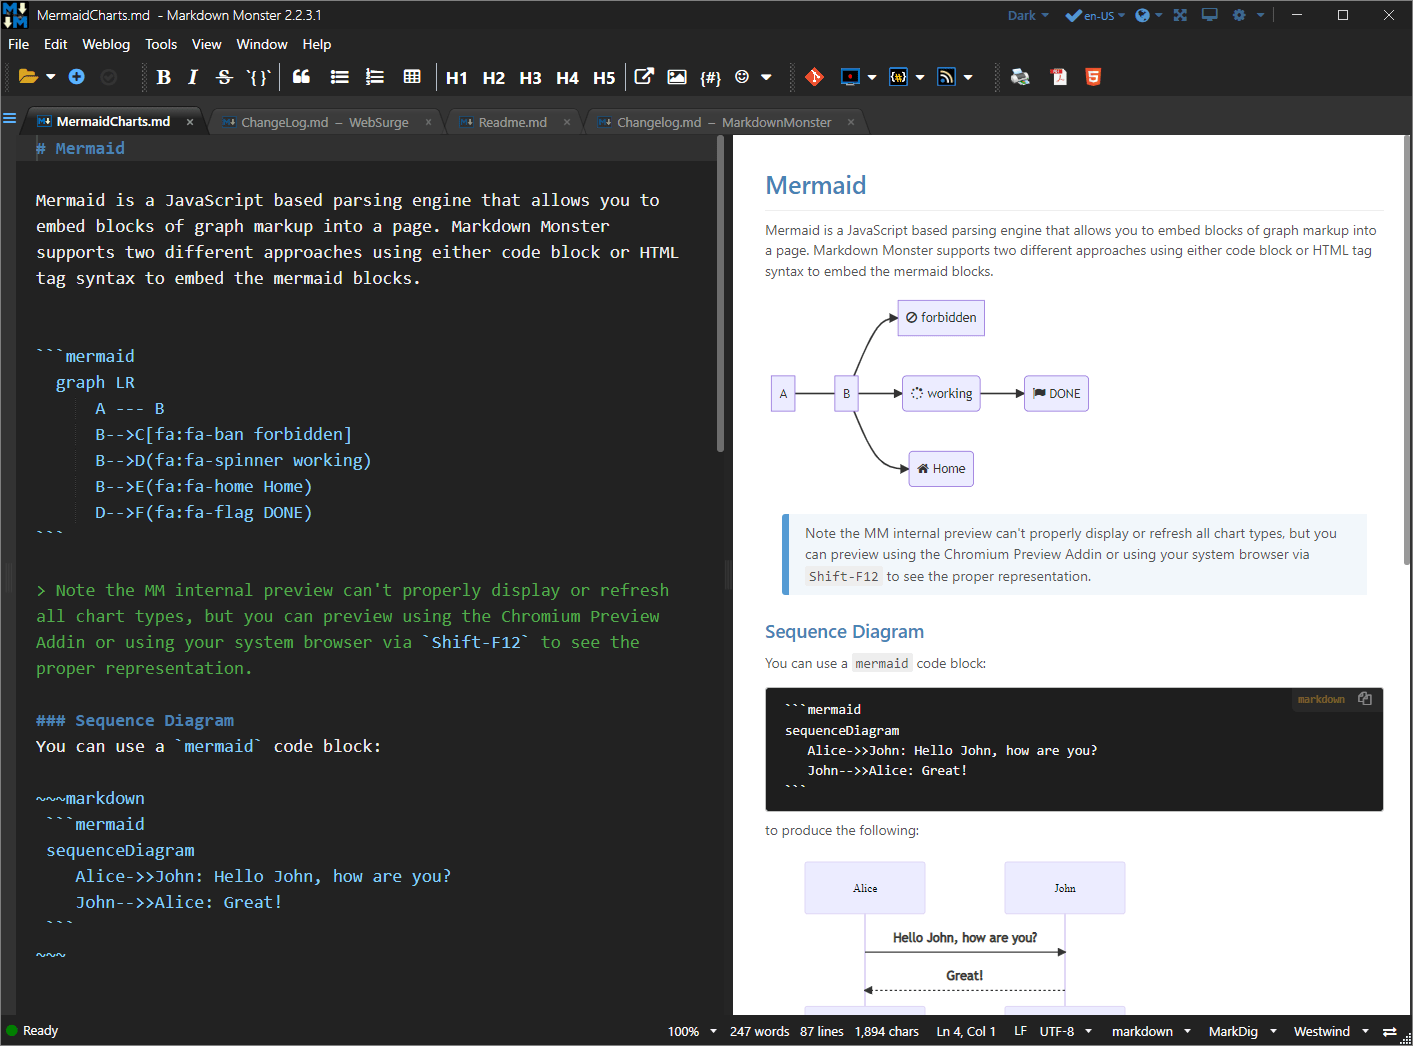
You can embed Mermaid Charts content into a Markdown document in Markdown Monster using either a Mermaid Markdown Code Snippet or using their Raw Html Syntax. Markdown Monster can preview the resulting chart in the previewer.
Here's what the Mermaid Markdown Syntax looks like:
 ```mermaid
sequenceDiagram
    Alice->>John: Hello John, how are you?
    John-->>Alice: Great!
    Alice-)John: See you later!
 ```
Note: There's an extra leading space in Markdown examples to avoid rendering the code block into Mermaid. Leave out that leading space.
which renders:
sequenceDiagram
    Alice->>John: Hello John, how are you?
    John-->>Alice: Great!
    Alice-)John: See you later!
Alternately you can use the Raw Html Syntax that Mermaid natively uses:
<pre class="mermaid">
graph LR
  A --- B
  B-->C[fa:fa-ban forbidden]
  B-->D(fa:fa-spinner)
  B-->E(Done!)
</pre>
Here's what Mermaid content looks like in the internal preview and previewed in Chrome:
Raw Html Syntax does not Html Encode
Note that if using the RawHtml syntax
<pre class="mermaid">, the Mermaid content between the brackets is not Html Encoded. This means you need to escape brackets inside of the block with< >with< >, double quotes"with"e;, ampersands with&etc.Therefore it's recommended to use the triple tick
mermaidsyntax, since it handles the proper encoding automatically.
Enabling and Disabling Mermaid Rendering
Mermaid rendering is enabled by default in v2.7.5 and later. The setting is configurable as it adds a little overhead for checking for the Mermaid tags in content and requiring a large linked dependency if Mermaid content is found.
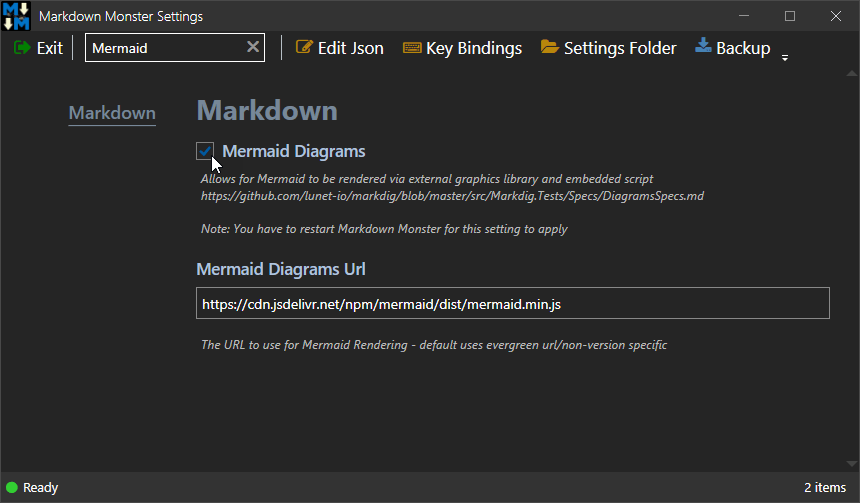
In order to enable or disable Mermaid diagram rendering in Markdown Monster you need to:
- Enable Mermaid Rendering (Tools | Settings | Mermaid Diagrams)
- You have to restart Markdown Monster for the change in settings to take
Specify Mermaid Script Version
You can specify a specific version of Mermaid using the
MermaidDiagramsUrlconfiguration setting. By default MM uses the latest, un-numbered version.
If you're pasting a mermaid chart for the very first time into a document, the chart won't render because the associated script is not in the page. By default MM caches pages and replaces only the content in order to provide smooth updates. However, in this scenario the Mermaid script is not loaded which means no preview. There are several ways around this:
- Refresh the Browser (f5 or Refresh Browser from context Menu)
- Activate another tab then back to the tab with Mermaid
- Enable the
AlwaysUsePreviewRefresh = trueConfiguration setting
Once Mermaid is enabled, MM automatically checks for Mermaid tags in the document and if it finds them adds the Mermaid library to the current page. It then renders the chart content using the standard Mermaid Charting syntax for its preview rendering.
JavaScript Code Required to Render Mermaid Charts in your own Html
Markdown Monster automatically adds the necessary script to execute Mermaid chart to display diagrams in the previewer. There's nothing else you need to do for previewing Mermaid.
But this specific preview implementation is specific to Markdown Monster, and not part of the raw Html or Markdown output - that is up to the hosting application that you plan to use the Markdown or rendered Html in which has to support Mermaid rendering.
Some platforms like GitHub and GitLap - like Markdown Monster - automatically detect Mermaid and add the appropriate scripts to render charts.
But if you use the Markdown in your own pages outside of Markdown Monster or a platform that support Mermaid, you will have to add the required script code to your own pages in order for Mermaid to render properly.
We recommend you do this conditionally based on content containing mermaid. For example, in my documentation solution I check whether the rendered content includes mermaid text and only if it does do I inject the mermaid code into the page.
{{% if (Topic.Body?.Contains("\n```mermaid") ?? false) { }}
    <!-- only load when needed since this script is huge -->
    <script id="MermaidScript"
            src="https://cdn.jsdelivr.net/npm/mermaid/dist/mermaid.min.js"></script>
    <style>
    pre.mermaid {
        border: none !important;
    }
    </style>
    <script>
    mermaid.initialize({startOnLoad: true});
    </script>
{{% } }}
If you refresh the page on the client side, you also need to handle updating the Mermaid charts via JavaScript:
<script src="https://cdn.jsdelivr.net/npm/mermaid/dist/mermaid.min.js"></script>
<script>
mermaid.initialize({startOnLoad:false});
</script>

<script>
// reloads a chart on the page
function renderMermaid(){
    mermaid.init(undefined,document.querySelectorAll(".mermaid"));
}
// application event that triggers a refresh
$(document).on('previewUpdated', function() {
   renderMermaid();
});
Generating Mermaid in Output
If you want to generate Mermaid output that is properly rendered there are a couple of ways you can do this:
- Print to Pdf
- Save As Html (self-Contained or loose files dependencies)
Print to Pdf
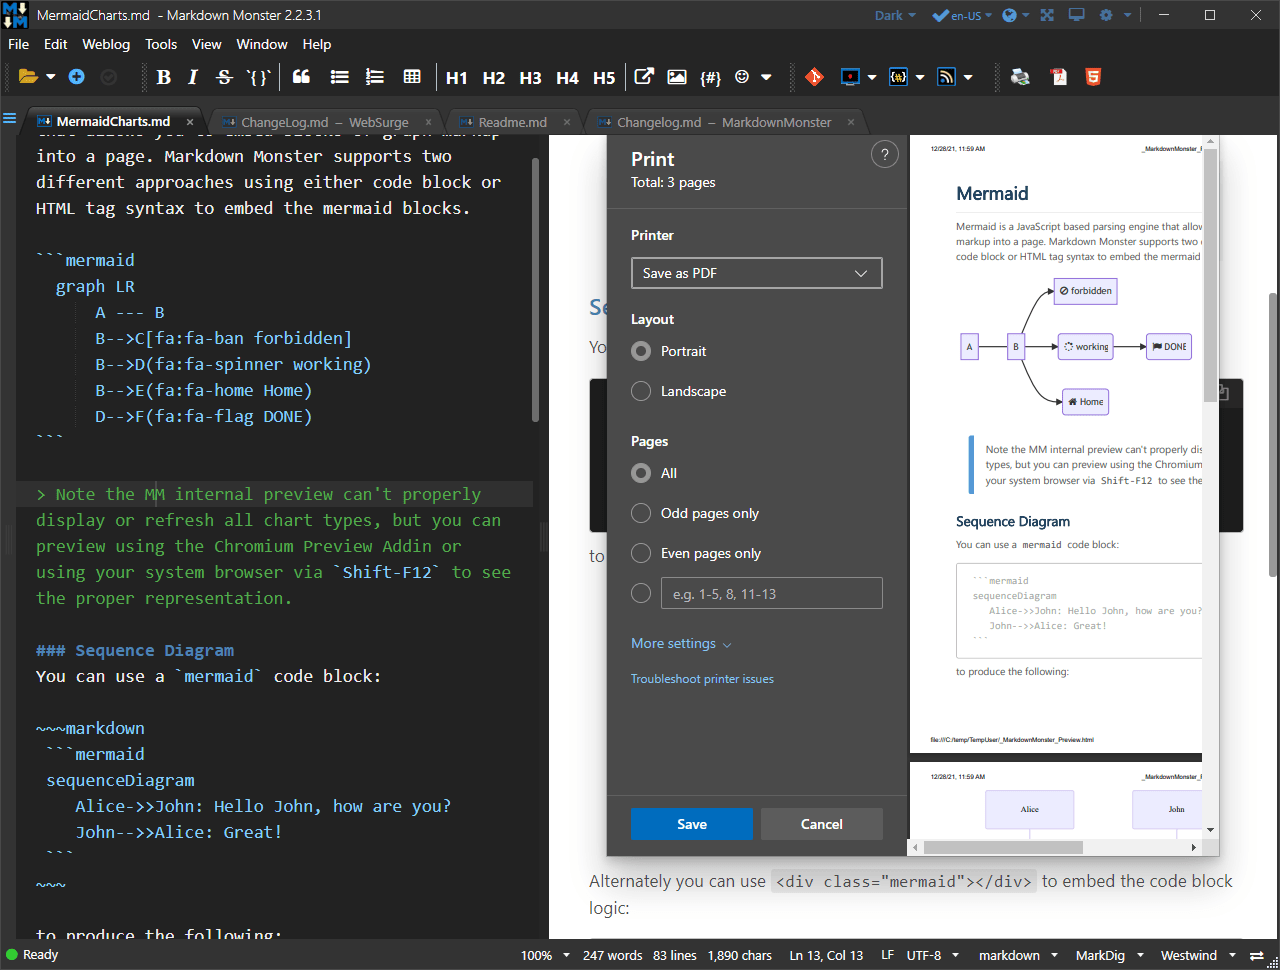
Pdf output can be generated with Markdown MOnster, but Mermaid diagrams will only work if you use the Print to Pdf feature, rather than the Save As Pdf functionality. The latter will not work with Mermaid diagrams, while the former does work to capture the Mermaid charts in Pdf. Print to Pdf uses graphics rendering of page output so it is more flexible for script generated output like Mermaid and MathML as opposed to the text/script based rendering in the Save As Pdf feature.
To use this feature:
- Make sure the Html Preview is active
- Use the Context Menu
- Use the Print Option
- Select Save As Pdf
- Pick a file name to save to
Export to Html
In order to export a page with Mermaid content you'll need to export including all of the related resources in the page, which includes the very large Mermaid library.
To use this feature:
- Make sure the Html Preview is active
- Use the Context Menu
- Use the Print Option
- Select Save As Html
- Select Save As Type Self-Contained, or Loose Files, or Zip
- Pick a file name to save to
If you choose self-contained the file will be very large due to the size of the Mermaid library. If you choose loose files all the files will be stored in a folder, or a zip file if you chose the Zip file option.
Mermaid Theming
Mermaid's default themes are unfortunately not very adaptable to light and dark themes.
Mermaid supports two ways for theme customization:
- Choosing one of several built in themes
- Completely customizing the theming
Built-in Themes
Mermaid has a very short list of built-in themes:
- neutral (default)
- default
- dark
- forest
- base (for custom theming only)
Out of these only the neutral theme works reasonably well both for light and dark preview themes and this is the default that MM uses. If you change the theme you'll need to reload the active document (tabbing to another document, changing preview theme or Refreshing the preview).
You can set this value through the MM configuration and the Markdown.MermaidTheme configuration value.
Custom Theming
Mermaid also supports customization via custom theme value configuration which allows setting individual colors and line widths etc. This functionality is fairly limited but it's possible to create customized theme values as described here.
Customized Mermaid Initialization
In addition to specifying the theme, you can also take over Mermaid's initialization process via a custom Initializer provided via JavaScript. Among other things you can use a custom initializer to completely customize theme rendering, but it can also provide for things like addins, security of the library and more.
I'll use theming here as the customization used for the example initializer.
In order to use custom initialization you need to effectively override the default behavior with JavaScript code provided in the Markdown Monster Preview Template.
This process involves:
- Customizing the
Theme.htmlHtml Preview Template - Creating a
window.mermaidInitializerobject in a<script>block
To open Theme.html and customize it:
- In the Previewer right click and choose Edit Preview Theme
- Go to the folder in Explorer and copy the folder
- Give the folder a new name for your custom theme
- Open
Theme.htmlin the new theme folder - Add a custom initializer as shown below
- Reload the current page by navigating to a different page or using Reload in the Previewer
- more Theme Customization info
The reason to create a new theme is so that changes you make aren't overwritten by updates. Any stock themes are overwritten
Here's what this looks like for theme customization in theme.html:
<!DOCTYPE html>
<html lang="en">
<head>
    <base href="{$docPath}" />
    <title>{$docTitle}</title>
    <meta http-equiv="Content-Type" content="text/html; charset=utf-8">
    <meta charset="utf-8" />

    <meta http-equiv="X-UA-Compatible" content="IE=edge" />
    <link href="{$themePath}..\scripts\fontawesome\css\font-awesome.min.css" rel="stylesheet" />
    <link href="{$themePath}Theme.css" rel="stylesheet" />

    <script src="{$themePath}..\scripts\jquery.min.js"></script>
    <link href="{$themePath}..\scripts\highlightjs/styles/vs2015.css" rel="stylesheet" />
    <script src="{$themePath}..\scripts\highlightjs/highlight.pack.js"></script>
    <script src="{$themePath}..\Scripts\highlightjs-badge.js"></script>
    <script src="{$themePath}..\scripts\preview.js" id="PreviewScript"></script>


    <!-- This -->
    <script>
        // theme customization
        // https://mermaid.js.org/config/theming.html#customizing-themes-with-themevariables
        window.mermaidInitializer = {
            'theme': 'base',
            'themeVariables': {
                'primaryColor': '#BB2528',
                'primaryTextColor': '#555',
                'primaryBorderColor': '#BB2528',
                'lineColor': '#F8B229',
                'secondaryColor': '#006100',
                'tertiaryColor': '#222'
            }
        };
    </script>
    <!-- End -->

    {$extraHeaders}
</head>
<body>
<div id="MainContent">
    <!-- Markdown Monster Content -->
    {$markdownHtml}
    <!-- End Markdown Monster Content -->
</div>
</body>
</html>
The window.mermaidInitializer instance is then used to initialize Mermaid.
In this case I'm using it for theme customization, but the initializer can be used to customize many aspects of Mermaid's rendering process.
Comment or report problem with topic